San Francisco, CA
Our Reglazing Process in San Francisco, CA
Prep, repair, etch, prime, spray and cure — the same disciplined sequence on every San Francisco tub, shower, sink and tile job, backed by a written 5-year warranty.
Mon–Fri 8 AM–6 PM, Sat 9 AM–4 PM
Direct answer
How does bathtub reglazing work?
Bathtub reglazing bonds a new acrylic-urethane coating to the existing tub in seven steps: clean, repair, etch, prime, spray and cure. SF Bathtub Reglazing Specialists does it in 3–5 hours across San Francisco, CA. Call (650) 710-4607, Mon–Fri 8 AM–6 PM, Sat 9 AM–4 PM, or reserve your seven-step San Francisco reglaze online for a free same-day quote.
How soon can I use it after reglazing?
The surface is dry to the touch in about 24 hours and ready for water 24–48 hours after the final coat cures. Most San Francisco jobs finish in 3–5 hours on site, the same day we start.
Why the sequence matters
Reglazing is not painting. The finish that makes a 1915 cast-iron tub in Bernal Heights look factory-fresh is a chemically bonded acrylic-urethane coating, and a bonded coating is only as good as the surface under it. The difference between a job that holds for 10–15 years and one that lifts off in flakes within a season comes down almost entirely to prep — the steps nobody sees once the tub is gleaming. AJ Dankins has run the same order on more than 3,420 San Francisco fixtures since 2012, on a clawfoot in Pacific Heights or a fiberglass unit in the Excelsior, because shortcuts in step three show up as failures in month six. A typical tub takes about four hours on site, and 92% of jobs finish in that single same-day visit — proof that the discipline of the sequence and speed are not at odds.
The step-by-step reglazing process
- Inspect and quote. We identify the material — cast iron, steel, porcelain, fiberglass, acrylic or cultured marble — check for cracks, rust-through and old failed coatings, and confirm the firm price before any work begins. In a tight San Francisco bathroom we also plan access, ventilation and where containment will go.
- Mask, sheet and ventilate. Walls, floor, fixtures and any nearby cabinetry are masked and sheeted off, and the room is set up for airflow. Hardware, the drain trim and old caulk come off so we can coat clean edges, not over them. This containment keeps overspray inside the work zone.
- Deep-clean the surface. We strip soap film, body oils, hard-water scale and any silicone residue. A fixture that is not chemically clean will not bond, no matter how good the topcoat is. On San Francisco rentals with years of buildup this step alone takes real time.
- Repair chips, cracks and rust. Chips are filled and feathered, hairline cracks are bridged, and rust spots around the drain and overflow are treated and built back level. We sand each repair flush so the finish lays flat with no telegraphing through the gloss.
- Etch or scuff-sand for adhesion. Porcelain and enamel get an acid or silane etch that micro-roughens the surface so the primer can grip. Fiberglass and acrylic cannot be acid-etched, so they are scuff-sanded and treated with an adhesion promoter instead. This is the make-or-break step.
- Apply the bonding primer. A tie-coat primer goes down as the bridge between the prepared substrate and the topcoat. It is what locks the system together and the reason a correctly primed tub does not delaminate.
- Spray the acrylic-urethane topcoat. Several thin, even coats are sprayed in a controlled, dust-minimized pattern. Thin coats lay flat and glossy; flooding it on causes sags and orange peel. An optional slip-resistant bottom is textured into the tub floor at this stage if you want it.
- Cure, re-caulk and hand back. The finish cures 24–48 hours. We re-caulk with fresh silicone, remove the masking, walk you through care, and hand back a warrantied, ready-to-use surface. We tell you the exact time you can use it before we leave.
How the method changes by material
| Surface material | Prep & method | Typical result |
|---|---|---|
| Porcelain over cast iron | Acid/silane etch + bonding primer + acrylic-urethane topcoat | Factory-smooth gloss, 10–15 years |
| Porcelain over steel | Etch + primer + topcoat | Smooth, durable, chip-resistant edges |
| Fiberglass / gelcoat | Scuff-sand + adhesion promoter + topcoat | Restores faded, crazed gelcoat |
| Acrylic | Solvent prep + flexible bonding coat + topcoat | Even color, hides scratches |
| Cultured marble | Repair + primer + topcoat | Removes etching and yellowing |
| Ceramic tile | Clean/etch grout + bond coat + topcoat | New color without tear-out |
Prep is where the work really lives
If you watched us reglaze a tub in the Inner Sunset, you would spend most of the morning watching prep and only a short stretch watching the spray. That ratio is correct. Cleaning and repair set the stage, and the etch is the single step that decides whether the coating bonds for fifteen years or fails in one. Acid etching micro-roughens porcelain and enamel into a profile the primer can lock into; on fiberglass, where acid does nothing, we scuff-sand and use an adhesion promoter to get the same grip. Nearly every peeling tub we are called to fix skipped one of those two steps — usually a DIY kit or a rushed job that went straight from a quick wipe to a flood coat.
Repair quality matters just as much for how the finish looks. A chip that is filled but not feathered leaves a ridge that telegraphs through the gloss in raking window light, and San Francisco bathrooms get a lot of that from bay windows. Rust around the drain has to be treated, not just covered, or it bleeds back through. We sand each repair flush and check it under a light before any primer touches the tub.
Containment and ventilation for tight pre-war bathrooms
San Francisco's older flats put compact bathrooms behind narrow hallways, sometimes three or four floors up in the Castro, Russian Hill or Nob Hill. That shapes how we work. We sheet off the room, run ventilation, and contain the spray so overspray never reaches the rest of the home. The solvent odor during spraying is real, which is exactly why containment and airflow are part of the process, not an afterthought — keep the windows open through the cure window and the smell clears within a few hours, and the cured finish is odorless.
What handover looks like
When we finish, you get fresh white caulk, the masking gone, a written 5-year warranty, and a plain-language care sheet: non-abrasive liquid cleaner, soft cloth, no scouring powder, no suction mats. We tell you the exact hour the tub is safe to use — usually 24 to 48 hours out depending on the product and the day's humidity in your part of the city. That is the whole point of doing it right: a Glen Park or Marina bathroom that is back in service in two days, looking like the fixture was just installed, for a fraction of what a tear-out would cost.
California safety & compliance: how we work legally and cleanly in San Francisco
Refinishing puts solvent-borne coatings and reactive chemistry into someone's home, and California regulates that work harder than most states. AJ Dankins keeps our process inside three overlapping rule sets — air-quality limits, the federal lead rule, and California's chemical-warning law — not as a sales point but because the alternatives are illegal, unsafe, or both. Here is what governs a San Francisco reglaze and how we handle each piece.
Low-VOC, CARB-compliant coatings and the Bay Area air rules
Every coating we spray has to meet the California Air Resources Board (CARB) statewide VOC limits, and locally we work under the Bay Area Air Quality Management District (BAAQMD) — the regional air regulator for San Francisco and the eight surrounding counties. (The South Coast district, SCAQMD, governs Los Angeles, not us — a distinction that matters when a product is sold as "compliant" without saying where.) We use low-VOC acrylic-urethane systems formulated under those limits, so the volatile-organic content released into your bathroom is far lower than the old high-solvent enamels refinishers leaned on a generation ago. The choice is not cosmetic: a non-compliant product can off-gas longer, smell stronger, and put more reactive vapor into a small, poorly ventilated pre-war bathroom.
We spray with HVLP (high-volume, low-pressure) equipment, which is the part of the job most homeowners never think about. HVLP atomizes the coating at low pressure so more of it lands on the tub and far less drifts off as airborne mist — better transfer efficiency means less overspray to capture and less solvent in the air. Combined with masking, sheeting and forced ventilation, that keeps the spray inside the work zone and the rest of the home clean.
EPA RRP lead-safe work on pre-1978 San Francisco homes
A large share of San Francisco's housing predates 1978 — the Victorians and Edwardians of Pacific Heights, Noe Valley, the Mission and the Richmond, plus the bulk of the city's flats — and homes from that era can carry lead-based paint and lead-bearing finishes around old fixtures. The federal Renovation, Repair and Painting rule (EPA RRP, 40 CFR Part 745) sets lead-safe work practices any time a job disturbs painted surfaces in a pre-1978 home: containment of the work area, dust control, HEPA vacuum cleanup, and verification when there is reason to suspect lead. When prep on an older San Francisco tub means sanding or grinding near painted surfaces, we treat the area as presumed lead-bearing unless testing says otherwise, contain it, and clean up with HEPA rather than sweeping dust into the household air. A DIY kit gives a homeowner none of that protection.
Isocyanate cure chemistry and Proposition 65
The durability of a sprayed acrylic-urethane finish comes from a two-part chemical cure: the topcoat and a hardener cross-link through isocyanate chemistry, which is what builds the hard, glossy shell that lasts 10–15 years. During the few hours that reaction is active, isocyanate vapor is present, and it is a respiratory sensitizer — exactly the kind of chemical California's Proposition 65 warns about. We control it the right way: supplied-air or properly rated respirators for the person spraying, mechanical ventilation moving air out of the work zone, and a contained cure window before anyone re-enters. This is the single biggest reason DIY spray kits are riskier than people assume — a homeowner spraying a two-part coating in an unventilated bathroom without supplied-air protection is breathing the one part of this trade that genuinely requires training and equipment. Once the finish has cured the full 24–48 hours, the reaction is complete and the surface is inert and odorless.
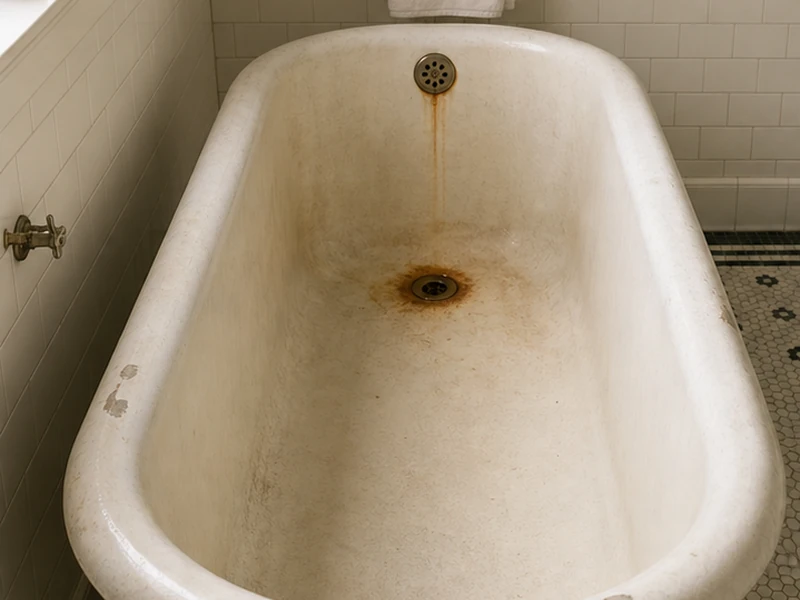
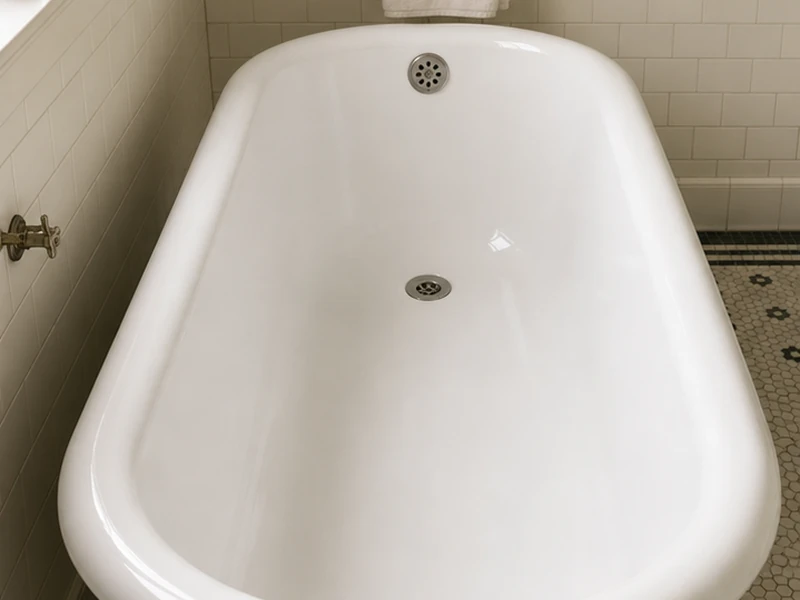
The process, in one tub
Same Noe Valley cast-iron tub, before prep and after the final coat cured. Hover or tap to reveal.
San Francisco reglazing process FAQ
What is the difference between reglazing, refinishing and resurfacing?
They all describe the same process — bonding a new coating to the existing surface after proper prep. None of them is a liner, which is a separate plastic shell dropped over the tub rather than a bonded finish.
Why is the etch step so important?
The acid or silane etch micro-roughens porcelain and enamel so the bonding primer grips a textured surface instead of a slick one. Skipping the etch is the number-one reason a reglaze peels, which is why we never skip it.
Do you contain the overspray and fumes?
Yes. We mask and sheet off the room, set up ventilation, and spray under containment so overspray stays inside the work zone. The solvent odor clears within a few hours of opening windows.
What warranty backs the finished surface?
Every San Francisco job is backed by a written 5-year warranty covering adhesion and finish defects under normal household use. SF Bathtub Reglazing Specialists is fully licensed and insured.
Book a San Francisco reglaze done right
Mon–Fri 8 AM–6 PM, Sat 9 AM–4 PM. Fully licensed & insured.